Showing posts with label Baking. Show all posts

10.25.2012

Joie 100th Days! Best Yellow Cake + Hazelnut & Milo Frosting

Followed Yellow Layer cake recipe from Smitten Kitchen and I have to say this is really really good! Yum yum...

hazelnut spread
Usually I make 2 types of frosting - the regular icing sugar buttercream and Swiss meringue buttercream. The icing sugar is overly sweet and for Swiss meringue, I usually use Wilton's pasteurized meringue egg white powder and it has a fake smell that I don't favor even if I add Madgascar vanilla paste. I wanted a sightly better option and I decided to try the buttercream with flour. 

It looked easy. I tried with the all natural, unbleached, gluten-free Bob's Mill AP flour. I failed. Lesson learnt- follow the instructions for first tries.

Whipping the new batch of frosting to a good consistency, I cheated with this - sublime hazelnut spread, added Milo and Hersey's cocoa powder. Ohhhhhh.... it taste great!

Best Yellow Layer Cake

Yield: Two 9-inch round, 2-inch tall cake layers, and, in theory, 22 to 24 cupcakes, two 8-inch squares or a 9×13 single-layer cake 

4 cups plus 2 tablespoons (480 grams) cake flour (not self-rising)
2 teaspoons (10 grams) baking powder
1 1/2 teaspoons baking soda
1 teaspoon (5 grams) table salt
2 sticks (1 cup, 1/2 pound or 225 grams) unsalted butter, softened
2 cups (400 grams) sugar
2 teaspoons (10 ml) pure vanilla extract
4 large eggs, at room temperature
2 cups buttermilk (475 ml), well-shaken

Preheat oven to 350°F. Butter two 9-inch round cake pans and line with circles of parchment paper, then butter parchment. (Alternately, you can use a cooking spray, either with just butter or butter and flour to speed this process up.)
Sift together flour, baking powder, baking soda, and salt in a medium bowl. In a large mixing bowl, beat butter and sugar in a large bowl with an electric mixer at medium speed until pale and fluffy, then beat in vanilla. Add eggs 1 at a time, beating well and scraping down the bowl after each addition. At low speed, beat in buttermilk until just combined (mixture will look curdled). Add flour mixture in three batches, mixing until each addition is just Incorporated.
Spread batter evenly in cake pan, then rap pan on counter several times to eliminate air bubbles. (I like to drop mine a few times from two inches up, making a great big noisy fuss.) Bake until golden and a wooden pick inserted in center of cake comes out clean, 35 to 40 minutes. Cool in pan on a rack 10 minutes, then run a knife around edge of pan. Invert onto rack and discard parchment, then cool completely, about 1 hour.

Frosting Ingredients

  • 5 Tablespoons Flour
  • 1 cup Milk
  • 1 teaspoon Vanilla
  • 1 cup Butter
  • 1 cup Granulated Sugar (not Powdered Sugar!)

Preparation Instructions

Bake your favorite chocolate cake and let it cool.
In a small saucepan, whisk flour into milk and heat, stirring constantly, until it thickens. You want it to be very thick, thicker than cake mix, more like a brownie mix is. Remove from heat and let it cool to room temperature. (If I’m in a hurry, I place the saucepan over ice in the sink for about 10 minutes or so until the mixture cools.) It must be completely cool before you use it in the next step. Stir in vanilla.
While the mixture is cooling, cream the butter and sugar together until light and fluffy. You don’t want any sugar graininess left. Then add the completely cooled milk/flour/vanilla mixture and beat the living daylights out of it. If it and fluffy. You don’t want any sugar graininess left. Then add the completely cooled milk/flour/vanilla mixture and beat the living daylights out of it. If it looks separated, you haven’t beaten it enough! Beat it until it all combines and resembles whipped cream. Grab a spoon and taste this wonderful goodness. If there is any left after your taste test, spread it on a cooled chocolate cake.
Cut yourself a piece and put it on a pretty plate. Grab a fork and prepare to experience the most divine pairing you can imagine. This frosting on chocolate cake is to die for. Sure, the recipe sounds strange — it has flour in it — but it’s sublime. Try it, you’ll see. You’ll love it so much you won’t go back.


8.06.2012

My Other Cake Projects

Practice makes perfect. I wanted to improve my fondant decoration skills and I volunteered to make for cakes for friends and families.


I used the rose mold for this cake and used water to glue them to the cake (the sides) before realizing its too 'plain' This was for my grandmother to celebrate her 81st birthday, so it had to be more festive, so I used red petal dust to paint the roses.


 The problem with painting with the glued flowers was that the colors bleed. Thus, I piped buttercream and painted the swirls with gold.
Lessons learnt: how to cover shaped cakes and don't glue down until sure of the cake design


Challenging myself to make 3-tiered cake. Everything went well except... Making a bright color from colored gel and mixing them to cover the cake was tiring and disappointing. I used Americolors and the Fuchsia color didn't even come close to bright pink. I had to use petal dust to wash color over the cake. Lesson learnt: buy ready made color fondants


Reason why I like to bake and decorate cake: to see the outcome and the children faces when they see the cakes


One of my favorite cakes. Simple and elegant
Used royal icing to make dots and sticking the daisy flowers. Then, I painted pearl petal dust on the dots. The tricky part was attaching the crystal brooch on the cake.

My First Tiered Cake for Cally - 2010

I know this is backdated a bit. Found some pictures and thought if I don't document these, I won't remember them. Going through my external hard drive brings back some good memories. I realize I haven't blog in 2011, and my last cake project in 2011 was for Grace woodland birthday cake, which then I was off on baking hiatus. And my pregnancy with #3 and growing my company came to prioritize above my baking hobby.

This was my first tiered cake using real sponge cakes and not cake dummies.


 Frosted both cakes and chilled them before placing the fondant. I found that using plastic gloves is so much more neater than using the cake smoother or greased hands. I had more control, no sweaty palms, and need I to mention- more hygienic? Next I inserted cake dowels to hold the weight if the top tier.
Using cake spatula to place the top tier on. Cover the imperfections with fondant pearls and ribbon


Use piping nozzles to make the circles. Paint glitter on the name


The cake sweated a while after out from the fridge into room temperature but it stabilizes after a while.

Airplane Cake For W - 2011

My nephew, Walter, is the same age as my daughter, and I asked his mom if I could bake him a cake. She told me he was into airplane and I went online to research for airplane cake.
The inspiration.
The carved cake. Base was double layer cake from loaf pan. Lots of stacking, speckling, and frosting for the desired shape.

Looking like a fish with the fins and all, floating on water
Added windows and clouds
Finish!

Into the fridge for cake and me to sleep

My sister-in-law added the candles and I thought the cake became cuter and happier.

8.05.2012

Woodland Birthday Cake

Source of Inspiration - Andrea Sweet Cake
 I made some sketches of some woodland animals and tried to make my first fondant 3d characters from scratch. It would be easier if I purchase books on how to make 3d fondant characters step by step... All I can say after this cake is that - I will be on a long hiatus to make characters


 The base was my sister's favorite Rose Levy's Grand Marnier Chocolate Chip Cake. I will probably find time some day to post the recipe up. Frosted it with chocolate ganache, then fondant the cake.
 
 The tree trunk needed a extra layer of cake and each layer was frosted with vanilla buttercream.Since I don't have brown fondant, I made chocolate from scratch with marshmallow and cocoa, which was surprisingly not very difficult as I expect it to be. Using toothpick and fondant veiner tools, I tried my best to give textures to make the trunk look somewhat real.

Use buttercream to pipe the vines and leaves
The birthday girl and her woodland friends
More friends. Making the wordings was another challenge.

The cake
 Grace, my darling niece, I hope when you are old enough for your mommy to let you use the internet browser, and that you come by to read Auntie's blog, you can feel my love for you. Hugs and kisses from Auntie!

J & I Mickey Clubhouse Birthday Party - 2011

All the decor was done by Balloon Imagination

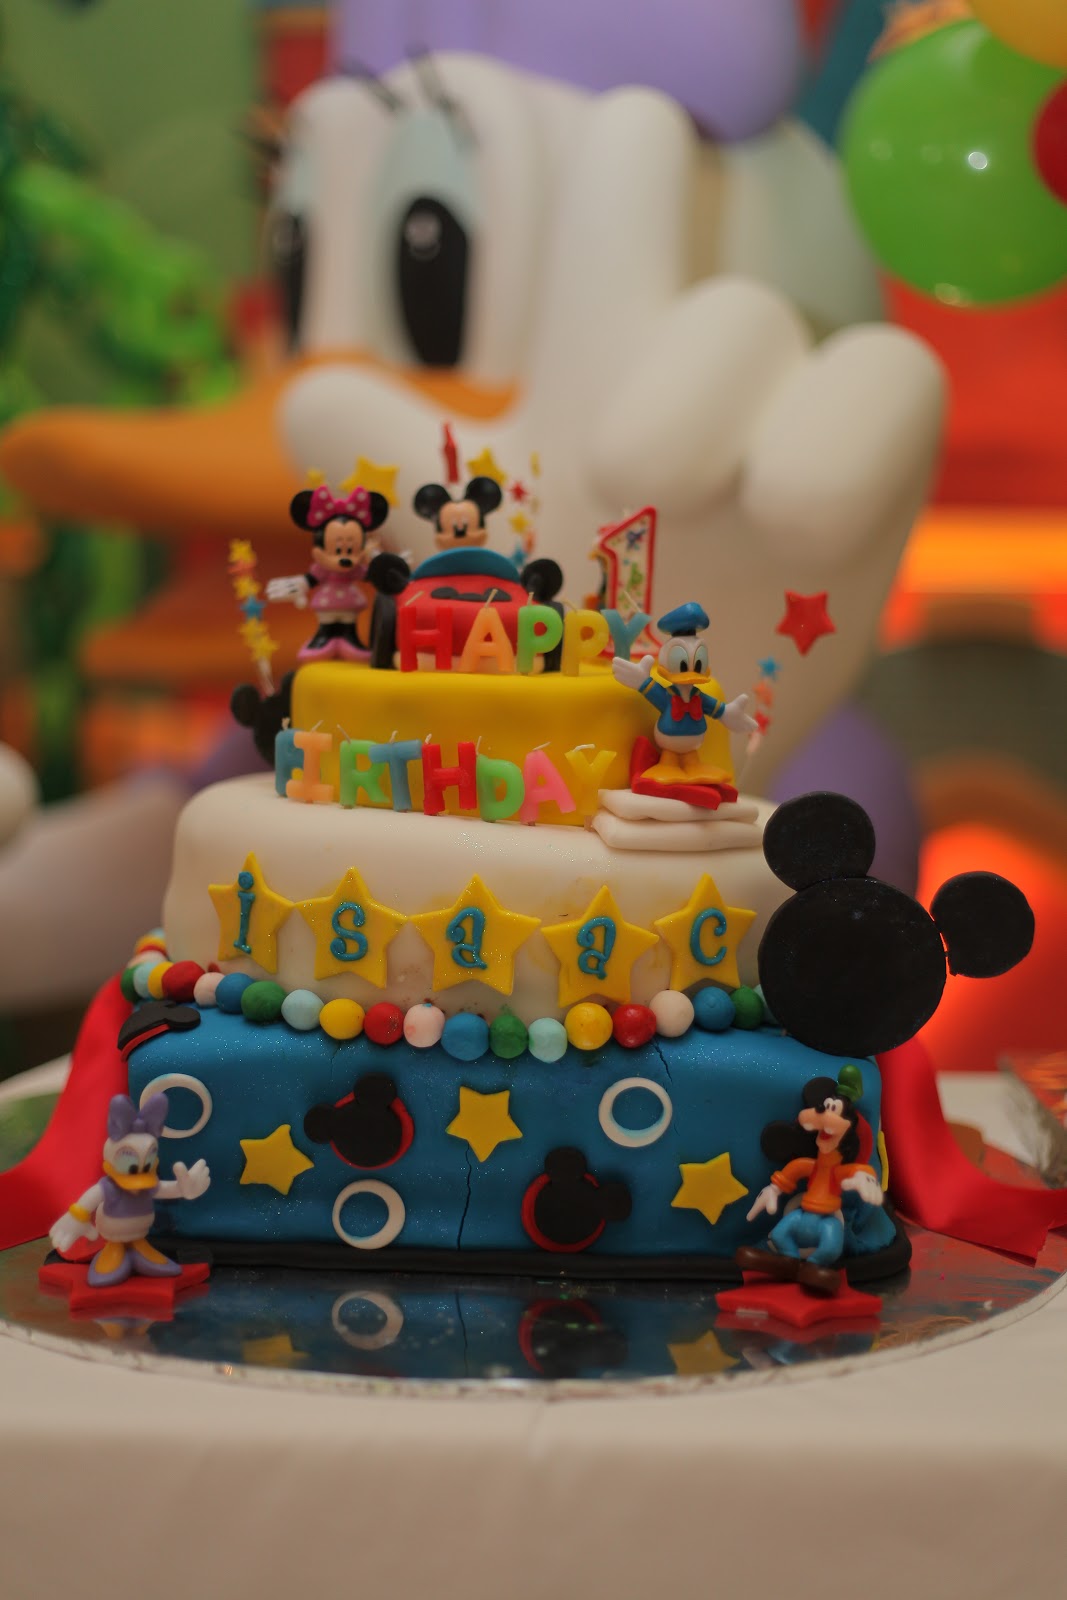
My children birthdays are only 1 day apart with Baby J turning 3 and Baby I turning 1. Baby I favorite character since infant was Mickey Mouse, so we decided to throw the kids a Mickey Mouse Clubhouse theme party. Upon Baby J's request, Tinkerbell 3d was also included in the backdrop.
Reception locket area for guests to register names. All little girls received necklaces and the boys watches. Mickey and Minnie photo booth area for the guests to take instant pictures for souvenirs.


 Baby J's princess dress is by I Love Gorgeous and Baby I's traditional Korean costume was from my mother-in-law who had it custom made in Seoul.

Mommy's hard work on the cakes. Making full tiered cake was not easy at all. Should have been smrter annd used cake dummies instead. I bought the cake pop online and had them shipped to my NY hotel when I had business trip there. All 200pcs! I had to purchase a new luggage to bring these pops back. My sis made 50 pops for me for the kids birthday and I don't think she will be doing more pops any time soon after this :)
Font used on the sticker was Budmo Jiggler.


 Goodybags were custom made art bags by Masterwork's second line, Giving Bag, and inside the bags were Crayola Twistables pencil set. More souvenirs for guests to bring back was custom caricature done by the artist hired for the party. Photo frame was a gift from the artist for the birthday girl.
We were so beat after this party. My husband swore off big birthdays but I told him we have to throw another big party for #3 1st birthday only to be fair. And guess what! 1 year after this party, our #3 is out! And her birthday is the same as her elder sis!